
DragGAN AI Photo Editor: A Step-by-Step Installation and Usage Guide
In the realm of digital art and photography, a powerful image editor is a must-have for creating stunning and professional-looking images. While Adobe Photoshop has long been the go-to choice for skilled editors and artists, newer and more easy-to-use AI-based solutions are emerging these days.
Among them is DragGAN AI photo editor, a new generation of image editors that offers intuitive photo manipulation by just dragging points on a picture.
But before diving into the world of DragGAN, it is necessary to understand how to install it properly, which can be daunting for some users. In this guide, we will provide you with a step-by-step walkthrough for setting up and using this AI instrument so you can start editing and creating impressive images in no time.
Key Takeaways:
- DragGAN utilizes generative adversarial networks allowing users to manipulate images with just a few cursor touches.
- It can be downloaded to a personal computer or accessed through the Google Cloud platform for easy online use.
- This AI tool can be used for various applications, from photo editing to creating dramatic changes in existing images.
What is DragGAN AI?
DragGAN AI is a powerful image editing tool that leverages the capabilities of generative adversarial networks (GANs) to transform and manipulate images in an intuitive and effortless way. The software operates in a drag-and-drop manner, allowing users to modify specific parts of a picture by simply clicking and dragging them to desired locations.
The unique concept of “handle points” and “target points” gives users full freedom over the image transformation process without requiring any prior knowledge or technical skills, which sets DragGAN apart from other popular editing tools.
Compared to other AI solutions like DALL-E and Midjourney, which use diffusion, DragGAN AI stands out for its use of the GAN framework, which enables more realistic and dynamic image generation.
Competing Generative Models: GAN vs. Diffusion
GANs and diffusion models may both fall under the umbrella of generative models, but they operate in completely different ways.
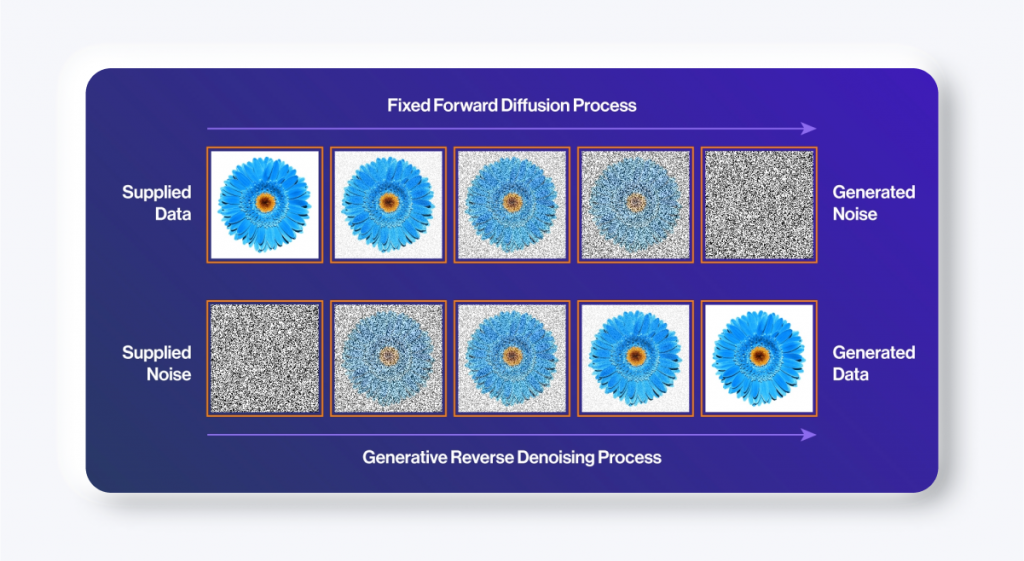
Diffusion Models
Diffusion models follow a standard approach to generative modeling. They take a low-quality image and gradually enhance it through diffusion. This process involves reducing discrepancies between the generated image and the original training data through specialized loss functions. With each step, the model refines the image until it’s as close to lifelike as possible.
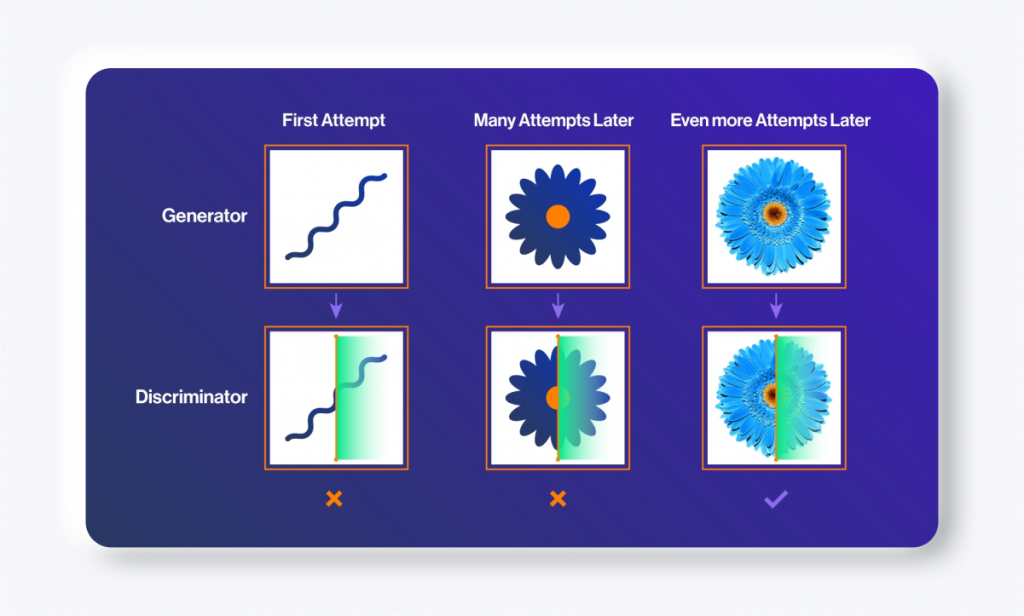
The GAN Approach
In contrast, GANs work on the basis of competition between two neural networks: the generator and the discriminator. As they continuously train and improve, the generator produces new data while the discriminator learns to differentiate between real and generated data. The goal of GANs is for the generator to produce increasingly realistic images that can fool the discriminator into thinking they are authentic.
What Is Better?
While both GANs and diffusion models are generative models, their techniques and end results vary significantly. GANs focus more on generating photorealistic images, while diffusion models excel at generating creative visuals that may not aim for photorealism but bring a unique perspective.
It is necessary to say that GANs require high processing power to operate efficiently, whereas diffusion models are gentler on your PC’s resources.
DragGAN Software Requirements
If you decide to download DragGAN on your computer, here is what you need to know:
DragGAN is designed to run on both Linux and Windows operating systems. To ensure optimal performance, it is recommended to use high-end NVIDIA GPUs with at least 12 GB of memory. DragGAN, like every AI system, is resource-intensive, and using lower-end GPUs may result in slower processing times and reduced quality of output.
Installing DragGAN AI Photo Editor
Let’s walk through the installation steps:
Step 1: Install the Necessary Software
Before installing DragGAN AI, you need to ensure that you have the necessary software installed on your system. Here’s what you need:
Python
Download and install the latest version of Python from the official Python website.
Once the download is complete, locate the installation file and double-click on it to execute it. This will launch the Python installer. The installer will guide you through the process of installing Python on your computer. Simply follow the prompts and make sure to select the appropriate options for your needs.
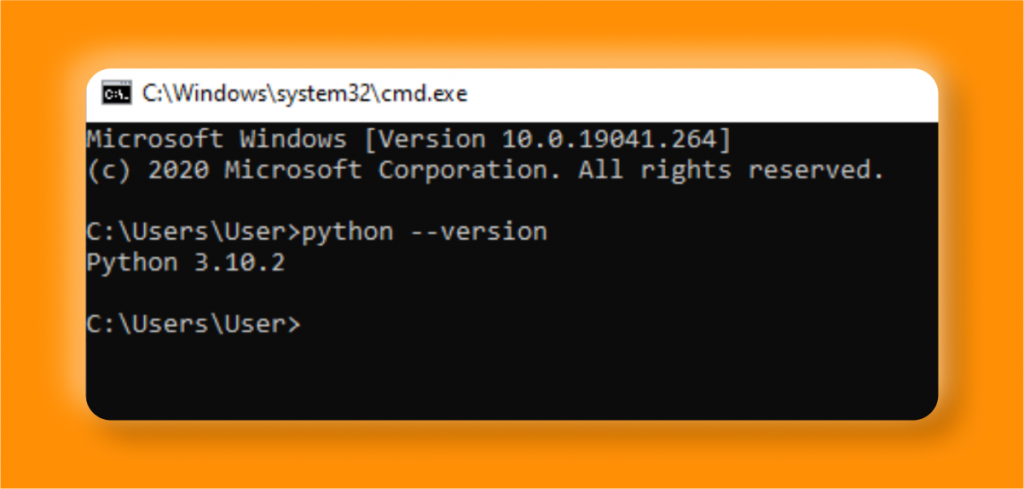
To ensure that Python has been installed correctly, open the command prompt on your computer by pressing the Windows key and “R” key simultaneously (if you are using Windows OS, of course). Then type in “cmd” and hit Enter. In the command prompt window, type in “python –version“. If you see a version number displayed, Python has been installed successfully.
Also, the software may need PyTorch 1.9.0 libraries, which can be downloaded from here.
Nvidia CUDA
The next thing you need is the Nvidia CUDA Toolkit. Go to the Nvidia developer website and download the CUDA 11.8 toolkit, ensuring you choose the appropriate version for your Windows system.
Important: DragGAN supports the 11.8 version of the toolkit.
After the download is finished, find the installation program and double-click on it to start. Accept the terms and conditions, then select “Customize” to access advanced options. In the customization menu, choose only the CUDA option and uncheck all other options. Click “Next” to initiate the installation process.
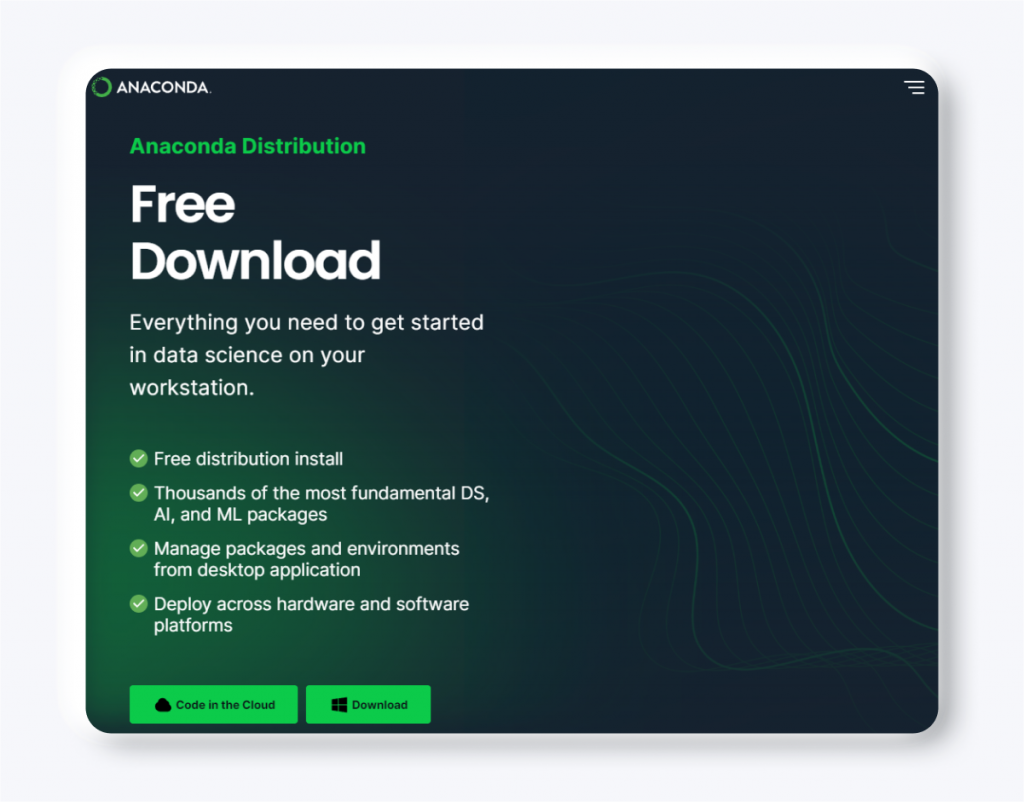
Anaconda or Miniconda
Next, you will need to have either Anaconda (recommended) or Miniconda installed on your system. Anaconda is a full-featured Python distribution that includes many useful libraries and packages for data science and machine learning, while Miniconda is a lightweight version that only includes the necessary components for running software.
If Anaconda is your preferred choice, you can download it from the official Anaconda website. The website offers a free version as well as paid options for enterprise use. Once you have selected the appropriate version for your operating system, simply click on the download button and start the installation.
Step 2: Install DragGAN
Once you have the required software installed, you can proceed to download DragGAN itself. Here’s how:
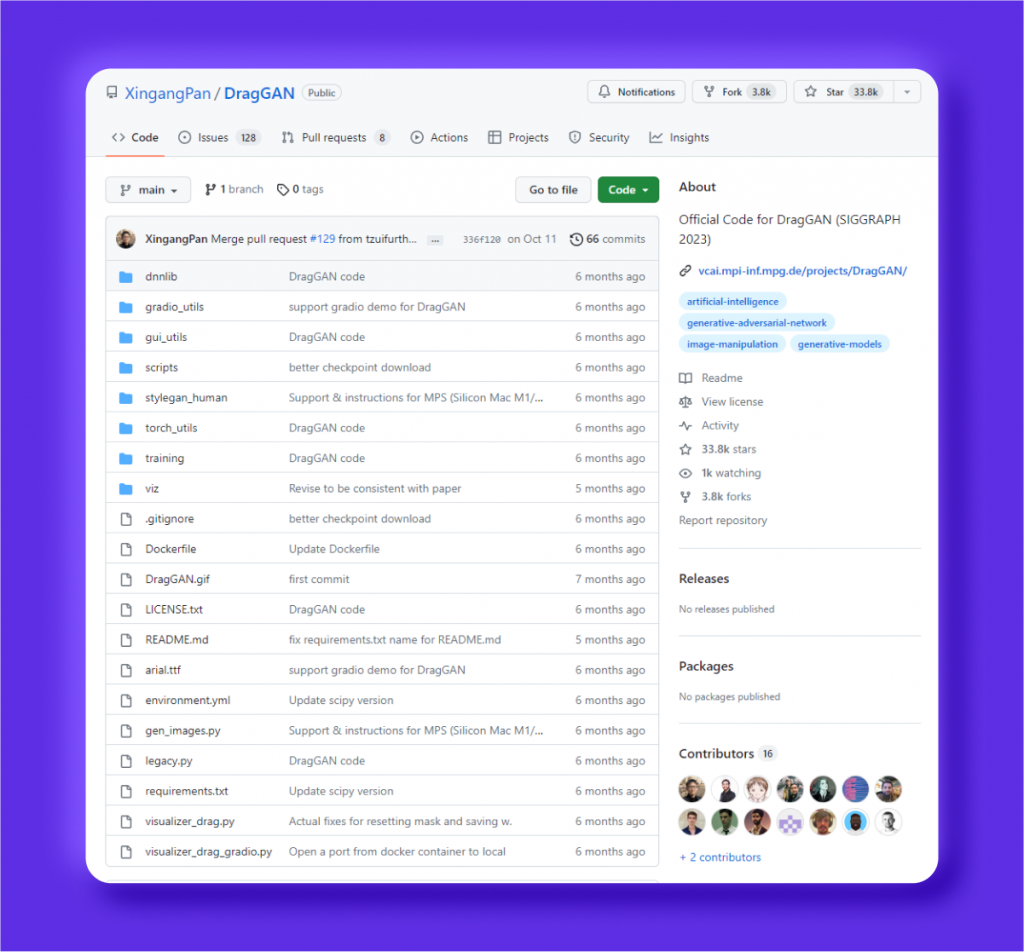
- Visit the DragGAN GitHub repository and click on the “Code” button. Copy the HTTPS link (or just copy this: https://github.com/XingangPan/DragGAN.git)
- Next, open your Anaconda (or terminal window) and clone the repository by typing the command git clone https://github.com/XingangPan/DragGAN.git. Hit Enter to clone the repository to your PC.
- Once everything is downloaded, you need to change a directory by typing the next command: cd DragGAN.
Step 3: Set Up the Environment
It’s time to set up the environment. Follow these steps:
- Now, you need to execute the conda env create -f environment.yml command for the environment to be created with the provided environment.yml file.
- Then, everything left is to activate the software by typing the conda activate stylegan3 command.
stylegan3 is the name of the environment file. If you want to update your environment, type pip install -r requirements.txt
If you have followed all the steps correctly and the environment has now been activated, your terminal should read:
(stylegan3) C:UsersuserDragGAN>
Step 4: Obtain the Models
DragGAN requires pre-trained models to function properly.
- To obtain pre-configured models, type this: python scripts/download_model.py.
Step 5: Launch DragGAN AI
After following all the necessary steps to set up the DragGAN AI photo editor, it’s time to launch the user-friendly graphical interface.
- To do this, run the command python visualizer_drag_gradio.py.
Congratulations! You have successfully installed DragGAN AI on your PC.
Troubleshooting the DragGAN AI GUI
If you encounter any errors while using the GUI, it is recommended to uninstall and then reinstall the “torch” library. You can do it by typing these commands: pip uninstall torch and pip install torch.
Another possible solution is to clear the cache of your browser if you are accessing the GUI through a web browser. This can be done by going to the settings or preferences section of your browser and selecting “clear browsing data” or “clear cache”.
Also, make sure that the installation process is successful and that all the required dependencies are installed properly. You can check this by going through the installation instructions again.
Starting DragGAN AI in Google Cloud
If the installation process is too complicated for you, you can also run DragGAN AI on Google Cloud. Today, cloud-based tools are becoming a norm in the AI industry. This option allows you to use the tool in a more flexible way.
To get started with Google Cloud, follow these steps:
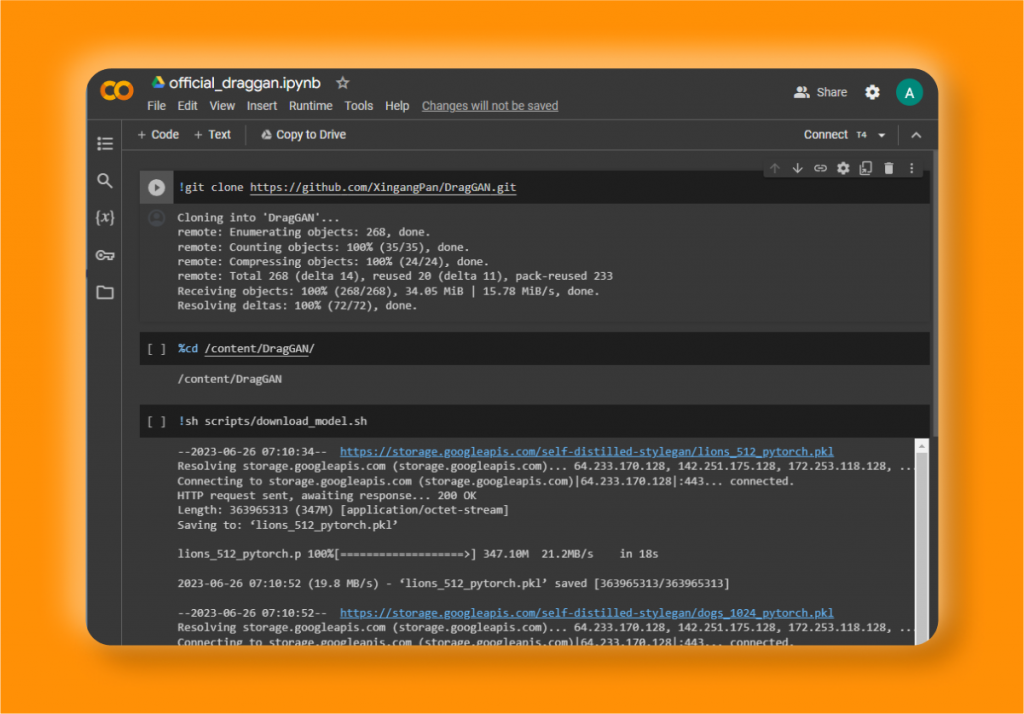
First, open the official DragGAN space in Colab and log in with your Google account. This will give you access to Google Cloud resources.
Next, click on the Connect button in the top-right corner to launch the environment. When encountering the message “This notebook was not authored by Google”, just select Run anyway.

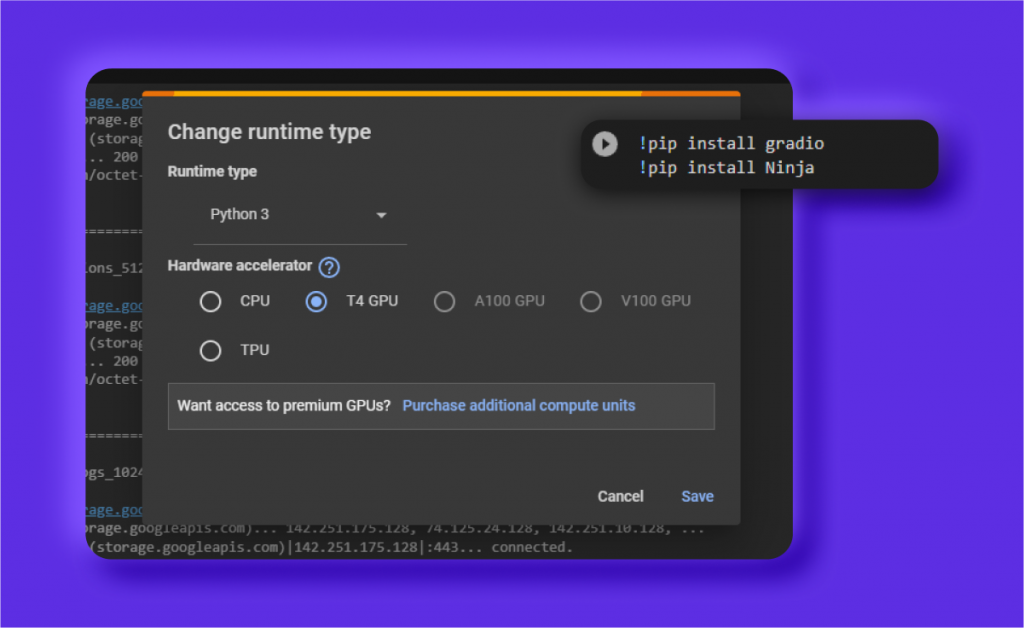
Now, navigate to Runtime and select Change runtime type. Here, ensure that the hardware accelerator is set to GPU and click on Save.
We now have our environment set up and ready to run DragGAN AI on Google Cloud. Basically, all you have to do is press each Play button one by one in the presented order. These buttons look like this:
After every button click, give the process time to complete.
In detail, here is what you need to do:
- Clone the DragGAN repository by hovering over !git clone https://github.com/XingangPan/DragGAN.git and clicking on the Play button.
- Once the processing is completed, click on the Play button for cd /content/DragGAN to navigate to the correct directory.
- Now, we need to download the pre-trained model by clicking on the Play button for !sh scripts/download_model.sh.
- After the downloading process finishes, install the dependencies by clicking on the Play button for !pip install gradio !pip install Ninja.
- Finally, run the command python visualizer_drag_gradio.py --share by clicking on the Play button to activate DragGAN AI.
- Wait until two URLs appear – one for localhost and another for direct access with a gradio.live domain. Right-click on the public URL of gradio.live and open it in a new tab.
You can now upload your images, tweak the settings, and see how DragGAN AI performs its magic!
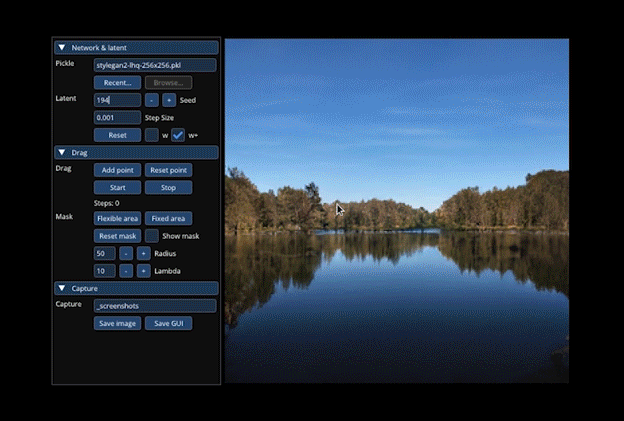
How to Use DragGAN AI
Using DragGAN AI is a seamless experience with its intuitive interface. Here’s a step-by-step guide on how to use DragGAN AI to edit and manipulate images:

Step 1: Upload Your Image
To get started, open DragGAN AI in your web browser using the local or public URL generated during the installation process. Once you’re on the DragGAN AI interface, you can upload your desired image by clicking on the “Upload” button.
Step 2: Select the Model
DragGAN AI offers different pre-trained models for various image categories. Choose the model that best suits your image by selecting it from the drop-down menu in the interface.
Step 3: Add Handle Points
To start editing your image, you need to add handle points. These points act as reference points for the areas you want to modify. Simply click on the image to add handle points and drag them to the desired locations. You can add multiple handle points to manipulate different parts of the image simultaneously.
Step 4: Start Editing
Once you have added the handle points, click on the “Start” button to begin the editing process. DragGAN AI will use its AI algorithms to seamlessly morph the image based on the movements of the handle points. You can see the changes in real time as DragGAN AI works its magic.
Step 5: Fine-tune and Save Your Image
If you’re not satisfied with the initial edits, you can continue to fine-tune the image by adjusting the handle points. DragGAN AI allows you to make precise modifications to achieve the desired result. Once you’re happy with the edits, click on the “Save” button to download the edited image to your computer.
Potential Applications of DragGAN AI
DragGAN AI offers a wide range of applications in the field of image editing and beyond. Here are a few potential use cases:
1. Elevating Professional Photography
One of the most significant use cases of DragGAN AI is in professional photography. With its advanced image manipulation capabilities, photographers can enhance and transform their photographs with ease. From adjusting poses to removing distractions in just a few clicks, DragGAN AI streamlines the editing process for photographers, allowing them to focus on capturing stunning shots.
2. Pushing the Boundaries of Graphic Design
Graphic designers also benefit greatly from DragGAN AI’s features. The software’s intuitive interface and powerful tools make it the perfect companion for creating visually striking designs. From resizing and reshaping objects to blending images seamlessly, DragGAN AI empowers designers to push the boundaries of their creativity.
3. Enhancing Virtual and Augmented Reality
DragGAN AI is a valuable asset in the world of virtual reality (VR) and augmented reality (AR). By seamlessly blending virtual and real elements, this software enhances the immersive experience of VR and AR environments. From creating lifelike backgrounds to incorporating realistic objects, DragGAN AI takes the realism of these technologies to a whole new level.
4. Inspiring Artistic Expression
Not just limited to professional fields, DragGAN AI also opens up possibilities for artistic expression. Its precise and flexible picture manipulation techniques allow artists to experiment and create unique works of art. From surreal landscapes to abstract compositions, DragGAN AI inspires artists to push the boundaries and unleash their creativity.
Closing Thoughts
DragGAN AI photo editor brings a revolutionary approach to the image editing industry with its advanced AI algorithms and intuitive interface. With the ability to seamlessly manipulate and enhance images, DragGAN AI opens up endless possibilities for creative expression.
FAQs
Is the DragGAN AI tool free?
Yes, DragGAN AI editing tool is an open-source project and completely free to use. You can access the code and use it for any personal or commercial purposes without any limitations.
How do I install DragGAN AI on my phone?
Yes, DragGAN AI can be used on your phone through various applications and tools. These can be found on the Google Play Store or Apple App Store. As DragGAN AI is open-source, developers can also create and customize their own applications for use on mobile devices.
Can I train my own GAN model?
Yes, you can train your own GAN model if you have the necessary skills and resources. These models can be trained with PyTorch, TensorFlow or other deep learning frameworks. Also, you can download GAN models trained by other users if you need them.


